I know spring is approaching, so I was thinking of a pair of light fingerless gloves with a small old far west lure ...
What do you think, are you in, too ?

The construction is very simple : you need to crochet 2 basic granny squares and then embellish them with some colourful fringes !!!
I crocheted them in just one afternoon !!!!
WHAT YOU NEED
I've been working with :


What do you think, are you in, too ?

The construction is very simple : you need to crochet 2 basic granny squares and then embellish them with some colourful fringes !!!
I crocheted them in just one afternoon !!!!
WHAT YOU NEED
I've been working with :
- a 4 mm hook
- a 50 g acrylic yarn ball from Filatura Cervinia CAPRICE shade denim blue (gloves)
- small amount of Sirdar COUNTRY STYLE wool blend DK shade 397 periwinkle ( for top/bottom/thumb borders)
- small amount of TIGER garn/yarn (plied), Sirdar Wash'n'Wear Double Crepe DK shade Original Denim, CHARITY Double Knit Pullskein shade 011 silver grey and Filati Cervinia CAPRICE shade orange (fringes)
- a pair of scissors
- a yarn needle
Please remember that I follow the US crochet termilogy, thank you !
You need to know how to crochet a traditional granny square and the "join-as-you-go" method !!!
Any DK acrylic yarn is suitable for this project !!! ;oD
Well, let's start the crochet fun !!!
BASIC GRANNY SQUARE pattern
The "chain 2" at the beginning of each round is my turning chain and it's never considered as a proper stitch.
From round 2 on, you always start to work into the first corner of your square and you end your round in this same corner!
Each shell is made of 3 DCs.
Each shell is made of 3 DCs.
Make a slip knot on your hook, chain 4, slip stitch in first stitch to form a ring.
round 1 : chain 2, work [3 DCs + chain 2] 4 times. Slip stitch in top of first DC to complete the round. Slip stitch even in next 2 DCs of same shell and in following corner.
round 2 : chain 2, work [3 DCs + chain 2 + 3 DCs and chain 1] 4 times, in each corner. Slip stitch in top of first DC to complete the round. Slip stitch even in next 2 DCS of same shell and in following corner.
round 3 : chain 2, work [(3 DCs + chain 2 + 3 DCs + chain 1 ) in each corner and (3 DCs + chain 1) in each chain-1 space] 4 times. Slip stitch in top of first DC to complete the round. Slip stitch even in next 2 DCs of same shell and in following corner.
round 4 : chain 2, work [(3 DCs + chain 2 + 3 DCs + chain 1) in each corner and (3 DCs + chain 1) in following 2 chain-1 spaces)] 4 times. Slip stitch in top of first DC to complete the round. Slip stitch even in next 2 DCs of same shell and in following corner.
rounds 5, 6, 7 and 8 : are worked as the 4th round, just remembering to increase (one shell + chain-1 space) along each side of the square 4 times, each round !!!
round 9 : chain 2, work [(3 DCS + chain 2 + 3 DCs + chain 1) in each corner and (3 DCs + chain-1) in following 7 chain-1 spaces)] 3 times.
The fourth side of the granny is worked with the "join-as-you-go" method to trasform your granny into a fingerless glove , so :
fold your square in half (back sides facing) and align the side to complete over the second side you have been crocheting.
Now, continue with your crocheting as follow :
work 3 DCs + chain 1 in fourth corner, then insert the tip of your hook in the space of 3rd corner from the front to the back and make a slip stitch (just started your joining!) and work the other 3 DCs to complete the 4th corner of your granny. Work another slip stitch in chain-1 space next to 3rd corner. Crochet a new shell (= 3 DCs) in chain-1 space next 4th corner and slip stitch in second chain-1 space of the above side. Crochet another shell in 2nd chain-1 space of 4th side and slip stitch in above corresponding chain-1 space.
We have to leave an open space to let pass your thumb, so crochet (3 DCs + chain 1) twice in next 2 chain-1 spaces of your 9th round. Work another shell in next chain-1 space and slip stitch (joining starts again) in the above matching chain-1 space. Crochet a shell in next chain-1 space, slip stitch in above chain-1 space. Work your last shell in last chain-1 space and slip stitch in the above last chain-1 space, plus another slip stitch in top of first DC made at the beginning of round 9.
Cut yarn and fasten off. Weave in all ends.
You will notice a mini slit at the bottom of your fingerless glove : I think this is a nice detail! ;oD
Please note : it could be that you need more or less rounds for your glove. To check which granny fits you best, I suggest you to measure the circumference of your hand at palm (that is the widest part of your hand) and regularly look at it at the end of each round (almost).


Remember to work this same pattern twice, as you need two grannies to have a pair of gloves ! ;oD
FINISHING TOUCHES
Once you have weaved in all the tails, you can decide to wear your gloves the way they actually are, but I prefer to add some simple embellishments to give them a nicer look !!!

We can start with the top edge, adding a simple border of single crochets (=SC) :
Pick up a contrasting colour and make a slip knot on your hook. Insert the tip in the top corner at the left of the joining side and work your first SC. Then crochet 3 SCs in top of every shell and 1 SC in each chain-1 space. Your last SC is made in the last corn to the right of the joining side. Slip stitch in 2nd stitch made. Cut yarn and fasten off. Weave in ends.

Now the bottom edge : make another slip knot on your hook using the same yarn (or maybe not!) and insert the tip in the top of first DC along the slit (looking at the above picture, you start to work in top of first shell on the right side!) and work your first SC. Crochet other 2 SCs in same shell and then work 2 SCs into the turning corner. Apply the usual pattern : 3 SCs in top of each shell and 1 SC in every chain-1 space. When you reach the second turning corner, remember to crochet 2 SCs into it. Then work your last 3 SCs in top of last shell. Cut yarn, fasten off and weave ends in.

Thumb hole : make a slip knot on your hook and insert the tip in the top of first DC of first shell on the back of the glove. Work, as usual, 3 SCs in each shell top and 1 SC in every chain-1 space. When you have worked the last SC in last shell, slip stitch in 2nd stitch to end the border. Cut yarn, fasten off and weave ends in.
FRINGES (the old far west touch!)

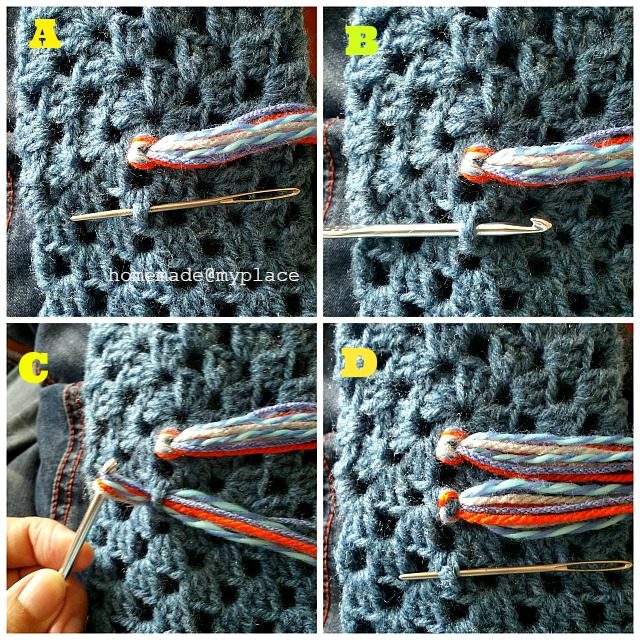
I've added some fringes on the external side of each glove. You need to find the centre of your granny square. Once found, you have to consider 5 shells : the first one is part of the granny centre (the one at the bottom), while the other four are the ones under the first one . Imagine them all as lined up along a vertical line ... look at the dots in below picture ...


You will attach each fringe at the DC in the middle of each shell !

Cut 4 lenghts of yarn, more or less about 40 cm each. Fold them in half and with the help of the hook, pull them under the DC in the middle of the shell ...

then pass the free strands into the loop on the left and voila' the first fringe is done ...

Repeat the same procedure for the other 4 fringes, from top to bottom ...

You will have something like the following ...

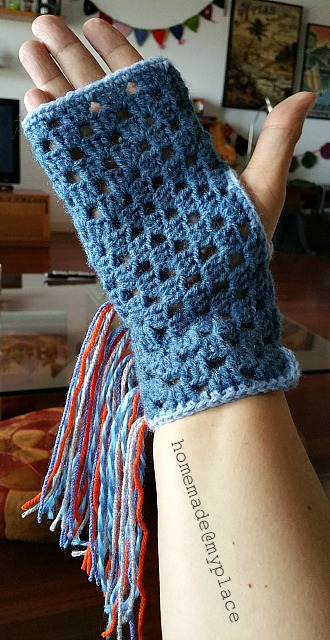
Trim the fringes to the lenght you prefer (I did use a book as a guide.... Ha! Ha! Ha!) ...

... and soon I was ready to wear my first pair of "fringe-rless gloves" ...

... Now is your turn, lovelies !!!! ;oD
xxxx Alessandra
Look for more photo tutorials/free patterns ? Well, then look HERE and have fun !!!
Are you a fingerless gloves fan ? You can find another free pattern HERE !!!!! ;oD
Once you have weaved in all the tails, you can decide to wear your gloves the way they actually are, but I prefer to add some simple embellishments to give them a nicer look !!!

We can start with the top edge, adding a simple border of single crochets (=SC) :
Pick up a contrasting colour and make a slip knot on your hook. Insert the tip in the top corner at the left of the joining side and work your first SC. Then crochet 3 SCs in top of every shell and 1 SC in each chain-1 space. Your last SC is made in the last corn to the right of the joining side. Slip stitch in 2nd stitch made. Cut yarn and fasten off. Weave in ends.

Now the bottom edge : make another slip knot on your hook using the same yarn (or maybe not!) and insert the tip in the top of first DC along the slit (looking at the above picture, you start to work in top of first shell on the right side!) and work your first SC. Crochet other 2 SCs in same shell and then work 2 SCs into the turning corner. Apply the usual pattern : 3 SCs in top of each shell and 1 SC in every chain-1 space. When you reach the second turning corner, remember to crochet 2 SCs into it. Then work your last 3 SCs in top of last shell. Cut yarn, fasten off and weave ends in.

Thumb hole : make a slip knot on your hook and insert the tip in the top of first DC of first shell on the back of the glove. Work, as usual, 3 SCs in each shell top and 1 SC in every chain-1 space. When you have worked the last SC in last shell, slip stitch in 2nd stitch to end the border. Cut yarn, fasten off and weave ends in.
FRINGES (the old far west touch!)

I've added some fringes on the external side of each glove. You need to find the centre of your granny square. Once found, you have to consider 5 shells : the first one is part of the granny centre (the one at the bottom), while the other four are the ones under the first one . Imagine them all as lined up along a vertical line ... look at the dots in below picture ...


You will attach each fringe at the DC in the middle of each shell !

Cut 4 lenghts of yarn, more or less about 40 cm each. Fold them in half and with the help of the hook, pull them under the DC in the middle of the shell ...

then pass the free strands into the loop on the left and voila' the first fringe is done ...

Repeat the same procedure for the other 4 fringes, from top to bottom ...


You will have something like the following ...


Trim the fringes to the lenght you prefer (I did use a book as a guide.... Ha! Ha! Ha!) ...

... and soon I was ready to wear my first pair of "fringe-rless gloves" ...

... Now is your turn, lovelies !!!! ;oD
xxxx Alessandra
Look for more photo tutorials/free patterns ? Well, then look HERE and have fun !!!
Are you a fingerless gloves fan ? You can find another free pattern HERE !!!!! ;oD
Please, show me your makes on IG using the following hashtag : #homemadeatmyplaceoriginals or tagging me @alessandrapoggiagliolmi .
Text, Design and Photography : Alessandra Poggiagliolmi
All Rights Reserved. No part of this pattern may be reproduced or transmitted in any form or by any means, without the prior written permission of the copyright holder.
A very nice simple style and wonderful embelishments! :-) X
ReplyDeleteThey are fun! A romantic biker could wear them too :-)
ReplyDeleteso fun and creative i love it <3
ReplyDeletebisnis online
usaha terbaru